I’m now with Picfair, where I’ll share and sell my photography through my own online store. The platform lets photographers set their prices and keep control of their work. My gallery will feature images available for personal and commercial use, with licenses handled through Picfair. I’ll keep adding new photographs as my collection grows. You can find my work and prints on my Picfair profile.
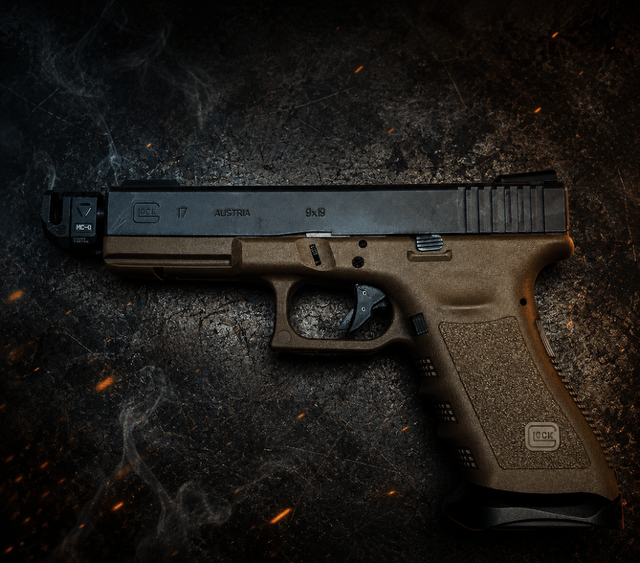
The Strike Industries Mass Driver Comp on a Gen 3 Glock 17 turned my full-size 9mm into the flattest-shooting pistol I own. The change was clear during fast strings, where the front sight returned to the target with less lift and less delay.
That result raises a fair question: how much credit belongs to the compensator? Ammunition, grip pressure, slide mass, optics, stance, and shooter skill all affect recoil. My range impression is personal, not a universal test result, so the best way to judge the setup is to compare it with a stock Glock under the same conditions.
Why the Strike Industries Mass Driver Comp on a Gen 3 Glock 17 Shoots Flat
How the Mass Driver changes recoil
A compensator uses expanding propellant gas to push against muzzle rise. The Mass Driver takes a different installation approach from a standard threaded compensator. It uses a non-threaded, recoil-operated design built around its own guide rod and recoil-system parts.
The result is a change in recoil character rather than the removal of recoil. Felt recoil, muzzle rise, sight recovery, split times, and smoothness are separate traits. On my pistol, the biggest gain was faster sight recovery during rapid fire. The gun felt less jumpy, and the front sight stayed easier to track.
The exact design and parts can vary by model. Check Strike Industries’ current product documentation for compatibility, installation details, and approved components before buying or fitting one.
Why the Gen 3 Glock 17 makes a good host
The Glock 17 gives the system a full-size frame, a substantial grip, and a 9mm slide and barrel combination with a long record of aftermarket support. Its size also gives the shooter more room to manage recoil than a compact or subcompact pistol.
Slide mass, barrel length, grip fit, and recoil spring weight all affect how a Glock feels. A shooter with a firm, repeatable grip may notice the compensator more during fast shooting than during slow groups.
Gen 3 compatibility still needs a careful check. Confirm the exact Mass Driver model, Glock 17 generation, caliber, barrel setup, and recoil assembly. Do not assume that a part listed for one Glock variant fits every 9mm model.
Installation on a Mass Driver-Equipped Gen 3 Glock 17
Check the parts before fitting them
Before installation, verify the correct Mass Driver version for a Gen 3 Glock 17 9mm. Review the included recoil components, barrel interface, guide rod, slide fit, and any small hardware supplied with the kit.
Unload the pistol first. Remove the magazine, open the action, and check the chamber both visually and by touch. Field-strip the Glock according to its factory manual, then install the compensator and recoil parts by following Strike Industries’ current instructions.
A third-party video or an old forum post may show a different revision. Use the instructions supplied for the exact product in hand, and do not guess at torque values or change parts without a clear reason.
Inspect the system before live fire
After assembly, check that the slide moves freely and that the recoil assembly sits correctly. Confirm that the compensator is secure and does not contact the slide, frame, or barrel in an unusual way.
Perform the function checks recommended by Glock and Strike Industries. Look for looseness, peening, unusual contact marks, damaged hardware, or abnormal wear. Document the original stock setup before changing anything, since returning to the factory configuration can help isolate a later problem.
Range Testing the Strike Industries Mass Driver Comp on a Gen 3 Glock 17
Rapid fire showed the clearest difference
With the same grip and ammunition, my stock Glock 17 had a familiar upward snap. The Mass Driver-equipped pistol still recoiled, but the impulse felt smoother and more controlled. The front sight settled sooner after each shot.
The difference was modest during slow, deliberate fire. It became much easier to notice during controlled pairs, five-shot strings, and other drills that demand quick follow-up shots. The pistol seemed to stay closer to the aiming point, which made it easier to keep visual track of the front sight.
That does not prove a universal speed or accuracy gain. Shooter familiarity also matters. After several sessions with the modified pistol, I naturally became more comfortable with its timing and recoil pattern.
Ammunition can change the result
Record the ammunition brand, bullet weight, load type, temperature, and round count during testing. A higher-pressure or faster load may produce more gas and change how the compensator feels. A weak practice load may produce less compensation and may also create cycling problems.
Practice ammunition and defensive ammunition should be treated as separate test groups. A pistol that runs well with one load may behave differently with another, especially after changing the recoil system.
For a fair comparison, use the same distance, target, stance, grip, magazine capacity, and shooting cadence. A shot timer can record split times, while video can show muzzle movement and sight recovery. Group size and chronograph velocity add useful data, but the stock and compensated setups must be tested under matching conditions.
Reliability and Practical Tradeoffs Matter More Than Flatness
Track cycling and maintenance
A flatter recoil impulse has little value if the pistol fails to feed, extract, eject, lock back, or return to battery. Test the magazines and ammunition you plan to use, and record every stoppage instead of relying on memory.
Recoil-system changes can affect cycling, especially with low-powered loads, fouling, weak magazines, poor lubrication, or unusual temperatures. Keep a round-count log and note every part change.
The compensator and nearby parts can collect carbon. Inspect the mounting surfaces, guide rod, fasteners, and contact points during cleaning. Follow the manufacturer’s instructions for lubrication, service intervals, replacement parts, and acceptable wear.
Check holsters and carry plans
The Mass Driver changes the muzzle profile and may add length to the pistol. Some holsters may not fit, while others may allow extra movement or leave the muzzle poorly supported. Check fit with the exact Glock, optic, weapon light, and compensator combination.
The setup makes sense as a range or competition build for many owners. A carry pistol has stricter needs, including secure holster fit, tested ammunition, dependable cycling, and simple handling under stress.
Check local laws, range rules, and manufacturer guidance before using a compensated pistol for defensive purposes. A setup that works well on a practice day still needs careful testing before it takes on a more serious role.
Is the Strike Industries Mass Driver Comp on a Gen 3 Glock 17 Worth It?
Where the modification helps most
The strongest benefit is faster sight recovery during rapid, controlled shooting. A full-size Glock 17 gives the shooter a solid grip and enough frame length to make good use of that change.
The Mass Driver may be a strong choice for competition practice, high-volume range work, or anyone distracted by muzzle rise. It can also make long practice sessions feel less tiring when the shooter maintains a steady grip.
The upgrade will not fix poor trigger control, a loose grip, or an inconsistent stance. Better recoil control still comes from both equipment and practice.
Who may prefer the stock setup
Some shooters may not feel enough improvement to justify the cost and added parts. Others may prefer a standard threaded barrel, a stock recoil system, or a Glock that fits existing holsters without changes.
Reliability testing takes time. So do cleaning, inspection, and ammunition checks. If the pistol must run with one known load and one holster, a stock configuration may offer a simpler path.
Conclusion
The Strike Industries Mass Driver Comp made my Gen 3 Glock 17 9mm feel exceptionally flat, especially during rapid fire. The front sight returned faster, muzzle rise was easier to control, and follow-up shots felt more natural.
Those observations are personal unless supported by timed drills, video, chronograph data, and a documented round count. The value of the upgrade depends on verified reliability, ammunition choice, holster fit, and the shooter’s priorities.
For range shooters and competitors, the Mass Driver is worth testing. Verify model compatibility, follow the current installation instructions, compare stock and modified performance under matching conditions, and inspect the system regularly. On this Glock 17, the result was a clear improvement in shooting feel, but the right setup is the one that stays reliable while helping you shoot faster and track the sights better.
In this video, we take an in-depth look at the Sig Sauer P320 Nitron Compact, showcasing its impressive features and upgrades. From its ergonomic design to its enhanced performance capabilities, this firearm is a favorite among enthusiasts. We will discuss the specific upgrades made to this model, including improved sights, trigger enhancements, and custom grips, which elevate its functionality and user experience. Whether you are a seasoned shooter or a newcomer to the world of firearms, this video will provide valuable insights into the P320 Nitron Compact and its potential for personal defense and sport shooting. Join us as we explore the specifications, handling, and overall performance of this remarkable handgun. #SigSauer #P320 #FirearmUpgrades
Hey everyone! In today’s video, I’m taking you on a solo run to Macon County, TN. From breathtaking views to charming small towns, I’ll show you all the highlights of my journey. I’ll also share some tips for solo travelers and what to expect when visiting this beautiful part of Tennessee. Grab your snacks and let’s hit the road together! Don’t forget to subscribe for more travel content! #ExploreTennessee #SoloAdventure #TravelTips
Spring is here, and it’s time for a ride to the beautiful Land Between the Lakes! Join us as we navigate through stunning scenery, encounter local wildlife, and enjoy the fresh air. This video is packed with tips for your own adventure and highlights of what makes this area so special. If you love the great outdoors, be sure to subscribe and follow along for more exciting journeys! #NatureLovers #SpringRide #landbetweenthelakes
Aspiring professional photographers who spend weekends on Middle Tennessee trails, rivers, and backroads often feel the pull to make their images pay without losing the joy of being outdoors. The core tension is real: a strong portfolio can still stall when starting a photography business brings pricing pressure, unpredictable weather, high gear costs, and the less-fun parts of photography entrepreneurship like boundaries, consistency, and follow-through. Many middle Tennessee outdoor photographers also get tripped up by limited local access knowledge and the logistics of getting to locations safely and reliably. The payoff is a clear way to turn outdoor time into paid work with fewer surprises and fewer business challenges in photography. Quick Summary: Launch Steps at a Glance ● Start with clear photography business planning, including services, pricing, and a simple startup checklist. ● Handle legal requirements for photographers early, including registrations, permits, and basic contracts. ● Build core photography business essentials, including gear, workflow, and client-ready delivery processes. ● Set up a practical step-by-step business setup that moves from planning to launch without skipping fundamentals. Understanding the Business Behind Your Photos It helps to define what you’re building. A business is not just great images, it’s a clear setup that lets you get paid consistently, serve clients well, and operate responsibly. Even a simple professional photography business connects three pieces: your legal structure, basic compliance, and a repeatable service you can deliver every time. This matters because outdoor shoots involve schedules, deposits, weather pivots, and real expectations. When your setup is solid, you spend less energy scrambling and more time guiding clients through trailheads, overlooks, and golden-hour plans with confidence. Think of it like planning a day hike. The legal structure is your route, compliance is your permit and safety checklist like get a business license, and your service is the pack system you can rely on in any conditions. With that foundation clear, choosing a structure and mapping the registration steps becomes straightforward.
Set Up Your Photography Business the Right Way This process helps you choose a business structure, complete your LLC and registrations, and keep every launch task in one place. For middle Tennessee outdoor enthusiasts turning trail time into paid shoots, it matters because solid setup makes deposits, reschedules, and client expectations easier to manage when conditions change.
Step 1: Choose the business structure that fits your risk and growth Start with your goals: hobby income vs. steady bookings, solo work vs. hiring, and how much personal liability you want to separate from the business. The IRS checklist to select a business structure is a simple way to compare options before you commit. Pick the structure you can explain in one sentence to a client and a tax pro.
Step 2: Decide if an LLC is your best “default” for outdoor work If you often photograph clients on uneven terrain, near water, or around gear, an LLC can be a practical layer between business obligations and personal finances. Confirm your direction by listing your likely contracts: sessions, prints, commercial licenses, and any second shooter help. If you are unsure, write down two paths, sole proprietor vs. LLC, and choose the one that supports your next 12 months.
Step 3: Complete your LLC formation and core registrations Follow your state’s steps to form the LLC, then secure your federal tax ID and any required local registrations so you can invoice cleanly. If you want help keeping the filings and ongoing compliance organized in one place, a formation service like ZenBusiness can streamline the setup while you focus on client work. Save every confirmation page and document in a single “Business Setup” folder you can find fast.
Step 4: Build a formation-and-compliance workflow you will actually use Create one running checklist with owners, due dates, and links to where you filed, then set two recurring calendar reminders: a monthly admin day and a quarterly review. Track four basics from day one: renewals, taxes, insurance, and contracts. The goal is simple: nothing important lives only in your head.
Step 5: Run a pre-launch audit before you accept paid bookings Do a quick simulation: send yourself an invoice, take a test deposit, and draft a weather reschedule message so you know your process holds up. Confirm your business name, payment account, and client agreement all match the structure you chose. Once that checks out, you are ready to book sessions with confidence. Launch-Ready Outdoor Photography Checklist This checklist turns your outdoor photography business startup into a simple, repeatable plan. For Middle Tennessee adventure lovers, it helps you keep bookings steady when weather, trails, and schedules shift fast. ● Confirm your business structure and matching legal business name. ● File required state and local registrations before taking deposits.
● Set a dedicated business bank account and payment processor. ● Draft a client agreement with weather, safety, and reschedule terms. ● Price sessions with travel time, editing hours, and deliverables included. ● Plan equipment purchases and backups for lenses, batteries, and storage. ● Build a simple marketing stack: portfolio, inquiry form, and review request. Finish this list once, then focus on creating trail-tested images. Turn Middle Tennessee Landscapes Into Consistent, Bookable Photography Income It’s easy to feel stuck between loving the outdoors and wondering how to turn photos into steady bookings in Middle Tennessee. The way forward is simple: choose a clear offer, set up the basics from the checklist, and keep showing up with entrepreneurial confidence instead of waiting to feel “ready.” When that mindset guides practical photography business advice, the result is a motivating business launch that leads to real inquiries, repeat clients, and a building sustainable photography business over time. Start small, stay consistent, and let booked shoots prove the business is real. Pick one next step for business owners this week, finalize your starter package and pricing, then make it publicly bookable. That momentum matters because steady work supports creative freedom, resilience, and a business that can grow with the season.
Get ready for an epic adventure as we hit the snowy trails of Land Between the Lakes (LBL)! In this video, we take you along for a thrilling ride through the winter wonderland, showcasing the beauty of snow wheeling. Watch as we tackle challenging terrains, share tips for winter driving, and enjoy the stunning scenery that LBL has to offer. Whether you’re a seasoned off-roader or just curious about snow wheeling, this video has something for everyone. Don’t forget to like, subscribe, and hit that notification bell for more outdoor adventures! #SnowWheeling #LBLAdventures #winterfun
Join me on an epic eagle watching adventure at Land Between the Lakes (LBL)! In this video, I’ll take you along as I explore the stunning landscapes and capture breathtaking shots of majestic eagles with my new-to-me Canon EOS R. Whether you’re a photography enthusiast or just love wildlife, you won’t want to miss the incredible moments we share. Don’t forget to like, subscribe, and hit that notification bell for more outdoor adventures! #EagleWatching #CanonEOSR #NaturePhotography
Join us for the 2026 Stoopidcold Car Show and Drift Experience, where the rubber meets the road! This event is all about celebrating automotive passion with a lineup of incredible cars and heart-pounding drift action. From custom builds to high-performance machines, there’s something for every car enthusiast. We’ll be capturing all the best moments, so make sure to stick around for the highlights and interviews with the drivers. Let’s rev up the excitement together! This event was held at the Nashville Super Speedway, January 10th, 2026 #CarShow #DriftLife #Stoopidcold
Join us as we explore the stunning landscapes of Land Between The Lakes in 2026! In this adventure, we’ll be hitting the 300’s Forest Service Roads, showcasing the breathtaking views and hidden gems along the way. Whether you’re a seasoned off-roader or just love nature, this video has something for everyone. Don’t forget to like, subscribe, and hit that notification bell for more outdoor adventures! #LandBetweenTheLakes #OffRoading #NatureLovers